Thursday, September 19, 2013

Taking information rich screenshots with IronWASP

NOTE: Find out what else is new in IronWASP version 0.9.7.0 from this release announcement post
 
Taking screenshots of HTTP Request and Response is a common task for pentesters during the reporting phase. So it only makes sense that this task be made easy and meaningful. The latest version of IronWASP comes with a 'Screenshot mode', thanks to a feature request from Himanshu.
 
Look at the screenshot below, it tries to illustrate the LFI vulnerability in demo.testfire.net.
 
 
There are four things to note in this image:
 a) The name of the vulnerable parameter is in blue color and with a bigger font size
 b) The payload that triggered this vulnerability is in red color and with a bigger font size
 c) The contents of the boot.ini file in the response body are highlighted in orange color, with a white font color and a bigger font size
 d) The non-interesting sections of the response body have been replaced with the text '[---- Snipped for brevity ----]'
 
The ability to make these type of edits to enhance the meaning of your screenshot is very easy in the screenshot mode. I will quickly run your through how this mode works.


Any request/response pair can be opened in the screenshot mode by clicking on the button with a camera icon, situated on the top-right corner of the control that displays the response.
 
 
Doing that will load the Request and Response in a new window.


 This window has a bunch of controls for formatting the contents of the displayed request and response. You can select a section of the text and apply any of these controls.

This includes the ability to select the color from a palette.


 You can resize the request and response sections by moving the divider between them, you can also make them appear side by side if required.

Once the formatting is done you can take a screenshot in the regular fashion using the printscreen key. Or alternatively you can use the button named 'Take Screenshot', this will momentarily hide all the controls on the window and take a screenshot automatically and show you a prompt to save the image file. Though it is continent the image created with this technique appears a little washed out, you can refer to it below.


 So there you have it, a very simple feature but am sure it would make a meaningful difference in your reporting process. If you have any feature requests then do drop me a line and I will do my best to incorporate them.


Two new IronWASP Modules - IronSAP and SSLSecurityChecker

NOTE: Find out what else is new in IronWASP version 0.9.7.0 from this release announcement post

IronSAP - SAP Security Scanner

IronSAP by Prasanna was the first module written for IronWASP and was supposed to be the released last year but after being stuck in development hell for while its finally out.

IronSAP automatically identifies most of the common and well known vulnerabilities associated with SAP installations. To get a good idea of the type of issues identified check out the slides from the IronSAP talk at nullcon Delhi.

IronSAP is incredibly easy to use. You can launch it from the 'SAP Security' section of the 'Modules' menu.
 
Once you do that you should get the usual authorization prompt.
 

After you click past it you are presented with a very simple and easy UI. Just enter the IP address of the system where SAP is installed and hit 'Start' and you should see the results of the scan appear in the results section below.


The source code for IronSAP is available on Github, but be warned <British accent> it is beautifully, unapologetically plastic spaghetti code </British accent> ;)

SSL Security Checker:

SSL Security Checker by Manish is another very easy to use module, it automatically checks the strength and security of any SSL service.

SSL Security Checker can be found in the 'Scanners' section of the 'Modules' menu.


Clicking that would give you the authorization prompt.


Once past that you get a very simple UI, enter target hostname and port and hit 'Go'. Once the tool is running you can see updates on the checks it is performing.
 
 
After all checks are completed the final results are displayed to you.
 

The source code for SSL Security Checker is available on Github, Manish also wrote a detailed post about how he created this module.

If you have an idea for creating a web security tool then IronWASP provides the best platform to turn your idea in to working code. If you would need help getting started then shoot me an email, I would be happy to help :)

What's new in IronWASP v0.9.7.1 (there is a lot!)

IronWASP v0.9.7.1 is now available for download. Users of older versions should get an update prompt when using IronWASP.

It has been a less than two months since the last release and a lot has been added during this time. I have added two of the most requested features - reporting and upstream proxy authentication support. I have also significantly mitigated two of the most reported complaints - false positives and crashes due to excessive memory consumption.

There are two new modules available in this version:
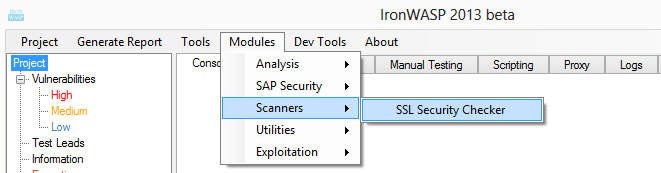
1) SSLSecurityChecker - SSL Layer Security Scanner by @msaindane
2) IronSAP - SAP Security Scanner by @prasannain

More details about these two modules is available here.

And here's what you get with the IronWASP core:

1) Reporting in both HTML and RTF formats. Sample Report
2) Memory usage cut by up to 50% during scanning compared to previous version
3) Massive reduction in False Positives by implementing Oscillating Time Delay technique
4) Awesome new Screenshot mode, see full details.
5) Support for NTLM and other authentication in upstream proxy
6) New start-up window
7) More intelligent error handling  in Scripting shell and logging of shell commands and output
8) Important bug fix in the JSON parser
9) Important bug fix in Payload Effect Analyzer
10) Existing Active Plugins moved to the core with improvements and bug fixes

Here is a quick peek at some of the new items:

Reporting:

It's finally here, the most requested feature. You can create reports in two formats - HTML and RTF. The HTML report is better looking and ideal for passing around. The RTF format is useful when you want to add the issues found by IronWASP as part of your pentest report. You can open RTF files in word and directly copy the contents on to your report.

To get an idea about what the report looks like check this sample HTML report.

To create a report click on the 'Generate Report' item in the menu.


This should open up the report generation window. Here you can see the list of all issues identified by IronWASP. You have the option to uncheck the issues that you don't want to be included in the report. Once that is done, clicking on the report generation button create the report in both the formats.


Once the report are generated you have the option to save in both the HTML and RTF formats, clicking on the corresponding format name will open a file save prompt.


Reduced Memory Usage:

Crashes when scanning large sites due to out of memory exceptions been a recurring complaint and I have finally taken some strong measure to address this. I ran IronWASP through a memory profiler to find out what sections were consuming most of the memory and have made design changes to address a lot of them.

The result is up to 50% reduction in memory footprint compared to the previous version when doing fully automated scanning.


In addition as a fail-safe I have added a system that constantly monitors the memory consumed by IronWASP and if it increases beyond a point then the CLR Garbage Collector is explicitly called to free up space.


Reduced False Positives through Oscillating Time Delay technique:

Every email I have received appreciating a feature or asking for a new feature or reporting an exception has invariably contained a note about there being some False-positives in the scan. False-positives are unavoidable and that is why IronWASP has a False-positive detection support, which is quite well received by the way.

However on closer observation it became clear that most of the False positives were caused by the time-based checks. A time-based check is where IronWASP sends a payload that will cause a time-delay in the response if the application is vulnerable. Time-based checks are part of SQL Injection, Command Injection, Code Injection and RFI detection.

The old time delay technique was very simple. IronWASP checked how long it takes for a regular request to be served by the application. Based on that time it selects a time delay payload and if the response for this time delay payload takes significantly longer then the same payload is sent again. If the delay happens one more time then it was declared as an issue.

This problem here was that time delays caused by temporary network issues or server overload issues were triggering false positives.


To address this the new version uses an oscillating system of time delays. This system sends payloads with big delay time and small delay time alternatively. Apart from checking if there is a delay the system also confirms if the small delay times were significantly smaller than the big delay times. Delays due to network issues or server overload would not typically fall in this pattern so they are not detected as vulnerabilities.


New Start Window and Support for NLTM Proxy Authentication:

In the new version when IronWASP starts the user is shown a window with a bunch of options to easily configure IronWASP to suit their environment.

Two things of particular interest are easy access to documentation on importing IronWASP's (FiddlerCore's actually) certificate as a trusted CA and an option to use the system proxy as upstream proxy which will automatically handle any upstream proxy authentication as well, just like Fiddler does.


Scripting Shell Error-handling and Logging:

For a lot of advanced users the scripting shell is the favourite part of IronWASP. At the same time there are a lot of beginners trying to use this feature to learn scripting. The following updates have been made to make their life a little easier:
 a) Multi-line shell automatically detects mixed use of tabs and space for indentation in Python script and fixes it
 b) Interactive shell automatically strips space at the start of Python commands when indentation is not expected (this turns out to be very common newbie mistake)
 c) Sometimes badly written script (like infinite recursion) might crash IronWASP and the user would lose all the code they typed. Now all commands and the results are automatically logged to a file named 'CommandLog.txt' inside the corresponding profile folder.


Active Plugin moved to the Core:

All the existing active plugins have been moved to the core of IronWASP, this was done to improve performance and memory efficiency. Though the old plugin files are still included with IronWASP they won't load by default since they use the same names as the internal active plugins.

If you want to use the Python/Ruby version of the Active Plugin instead of the core ones then just make sure the plugin name is different than the list of internal plugins and it should work as before.

Enjoy the new features and enhancements, work on the next version begins tomorrow :)
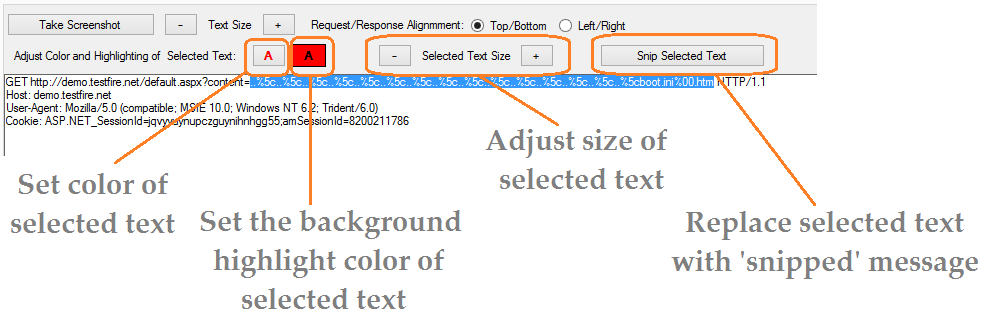
 

Wednesday, September 11, 2013

A very simple break down of how a spam message spreads on Facebook

Spammers always use creative ways to grab user attention. Today I noticed the following post in my Facebook news feed.


WhatsApp is a popular messenger app on mobiles and this post promises the same WhatsApp for PCs as well. That should be enough to attract the attention and clicks of a huge number of users.

Clicking on this link could actually give you WhatsApp on your PC, or it could be a spam link that tricks you in to giving away your facebook account details or even worse it could try and install malware on your system.

To find out which of these three actually happens we need to investigate the link in that post without actually clicking on it.

The link in the post is http://bit.ly/whatsappatsolutionbuzz , let's start our analysis by visiting this page through IronWASP. We go to the 'Manual Testing' section of IronWASP and click on the 'Create New Request' button, this lets use create a new HTTP Request equivalent to visiting this link from the browser.


The 'New Request Creation' wizard opens up, we enter the URL in this wizard and hit next.


And then we give this request a name to easily remember and track it. Since this is the first link we are visiting, let's name it as 'FirstLink' and then click on 'Create Request'.


Now we can see the created request. Let's send this by clicking on the 'Send Request' button. This is more or less technically equivalent to visiting the same URL in your browser but without the risk of being infected.


The response from the server is a 301 redirect and the location to which we are being redirected is http://new.solutionbuzz.com/test.php


solutionbuzz.com is not a domain name that I have heard of and I am not sure if this site is safe or if it serves malware. So let's visit this URL also using IronWASP but this time let's add a twist to it. If this site is serving malware then it would have mechanisms to detect if you are sending a request from a browser and if so what browser you are using. This can be determined by checking the User-Agent header in the request. In addition to the user-agent header a browser typically sends a bunch other headers with each request. The first request we created did not have any of these headers and so it would be easy to determine that the request was not actually sent from a browser.

This time let's send the User-Agent and other additional headers. We click on the 'Create New Request' button again and open the 'New Request Creation' wizard. After that we enter the URL as http://new.solutionbuzz.com/test.php. This time in addition we select a user-agent from the list of available user-agents, I am selecting Internet Explorer 6 as it is an easy and tempting target. I also ask IronWASP to send additional headers that browsers would typically send with a request to make it look like a legitimate request.


You can see from the image below that the Request has additional compared to the previous request. Once this is sent we get a 200 OK response. Let's look at the body of the response to see what the site has served us.


The body of the response contains a small snippet of JavaScript. Let's clean it up and see what it actually does.
 

Ok, the script is now cleaned up using jsbeautifier.org. Let's understand what the code does.


The script checks if the current URL has a location.hash value defined. If it is defined then it takes the hash value and adds it at the end of the URL http://app.solutionbuzz.com/index.php? and loads that URL in the browser.
If the hash value is not defined then it loads the page https://www.facebook.com/dialog/oauth?type=user_agent&scope=user_groups%2Cuser_photos%2Cpublish_actions&client_id=399141353502152&redirect_uri=https://adf.ly/VSseC in the browser.

The second URL is interesting because it is a Facebook URL, let's break down this URL. The first part of the URL says /dialog/oauth, this URL is used by Facebook to display a prompt to the user asking if he/she wants to authorize an app using OAuth. OAuth is a system by which you can give an application access to your account (Facebook account in this case) without sharing your password with the app. For example you can let your Twitter app post your tweets on your Facebook account without having your Facebook password. While giving authorization you can clearly define what access you want to give to the app, the app will only be able to perform the actions specified by you.

Now, lets see what kinds of access the app is asking in this case. This information is available in the scope parameter of this URL - scope=user_groups%2Cuser_photos%2Cpublish_actions. This value is URL encoded, lets decode it. Though decoding can be done using IronWASP's Encode/Decode tool, I prefer doing the decoding from the interactive Python shell of IronWASP as it gives me flexibility to handle multiple encodings and in splitting, slicing the decoded values easily.


As you can see the decoded value is scope=user_groups,user_photos,publish_actions. the scope parameter has three comma separated values user_groups, user_photos, publish_actions.
So its asking for three permissions, access to user contacts (user_groups), access to user's photos including all the private ones I believe (user_photos) and to have authorization to make posts on your behalf (publish_actions).

Hmm, let's rewind a bit here. We clicked on this click because we wanted to download WhatsApp for PC but instead we are at a page where an app is asking for authorization to view all our contacts, our photos and to post messages on Facebook on our behalf.

It's starting to look suspicious at this point but before we can arrive at any conclusion we must first find out which app is asking for permission here. This can be found out by looking at the value of client_id parameter, its client_id=399141353502152. This number is the unique id given to this Facebook app, and the name of the app with this id can be found by visiting the URL https://www.facebook.com/apps/application.php?id=399141353502152.


Ok, so the app that is asking for these permissions is Adfly. A quick Google search tells us that Adfly is a payment based URL shorter service which has no affiliations with WhatsApp.


So this is just a trick to let you give authorization to the Adfly app in the hope of getting WhatsApp for your PC. And once you do that this app posts the same spam message on your behalf in your timeline and in all the groups that you are a member. Some of your friends will click on it and the whole cycle is repeated.

The URL has one more parameter, redirect_uri=https://adf.ly/VSseC, this is the URL to which you will be taken after you have authorized the Adfly app. This is a URL shortened with Adfly, if you are curious to find out where this URL takes you then try it out yourself using the steps explained above.

So the take away here is that clicking on posts claiming to give you free stuff or other interesting things is mostly a spam, so don't click on them. And whenever an app is asking your for authorization take a moment to find out a bit about the app and then understand what permissions it is asking for before granting them.