NOTE: Find out what else is new in IronWASP version 0.9.7.0 from this release announcement post
Taking screenshots of HTTP Request and Response is a common task for pentesters during the reporting phase. So it only makes sense that this task be made easy and meaningful. The latest version of IronWASP comes with a 'Screenshot mode', thanks to a feature request from Himanshu.
Look at the screenshot below, it tries to illustrate the LFI vulnerability in demo.testfire.net.

There are four things to note in this image:
a) The name of the vulnerable parameter is in blue color and with a bigger font size
b) The payload that triggered this vulnerability is in red color and with a bigger font size
c) The contents of the boot.ini file in the response body are highlighted in orange color, with a white font color and a bigger font size
d) The non-interesting sections of the response body have been replaced with the text '[---- Snipped for brevity ----]'
The ability to make these type of edits to enhance the meaning of your screenshot is very easy in the screenshot mode. I will quickly run your through how this mode works.
Any request/response pair can be opened in the screenshot mode by clicking on the button with a camera icon, situated on the top-right corner of the control that displays the response.

Doing that will load the Request and Response in a new window.

This window has a bunch of controls for formatting the contents of the displayed request and response. You can select a section of the text and apply any of these controls.
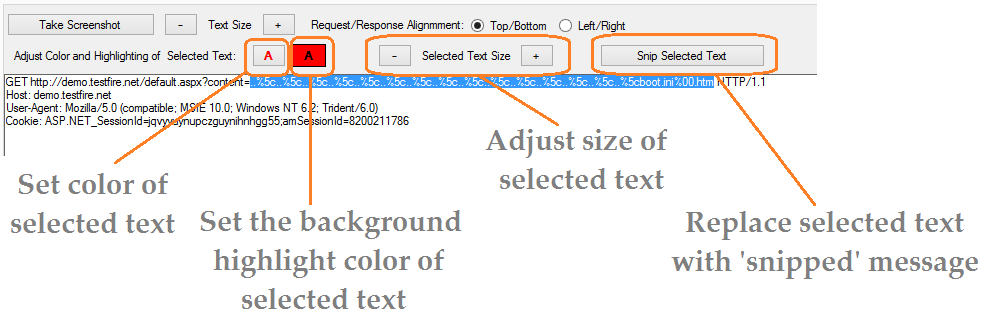 This includes the ability to select the color from a palette.
You can resize the request and response sections by moving the divider between them, you can also make them appear side by side if required.
Once the formatting is done you can take a screenshot in the regular fashion using the printscreen key. Or alternatively you can use the button named 'Take Screenshot', this will momentarily hide all the controls on the window and take a screenshot automatically and show you a prompt to save the image file. Though it is continent the image created with this technique appears a little washed out, you can refer to it below.

No comments:
Post a Comment